

You're in for a treat with these buttery shortbread cookies! They take just five ingredients: unsalted butter, powdered sugar, flour, salt, and vanilla. Start by creaming the butter and sugar until fluffy—trust me, it's key to that melt-in-your-mouth texture. Then, mix in your dry ingredients until you have a soft dough. Roll it out, cut out fun shapes, and bake until they're lightly golden. These cookies are perfect for holiday cheer! Plus, you can add chocolate or sea salt for a twist. Stick around, and you'll discover more tips to make these cookies even more incredible!
Main Points
- Shortbread cookies require only five simple ingredients: butter, powdered sugar, flour, salt, and vanilla extract for a rich flavor.
- The recipe is straightforward, making it perfect for both novice bakers and experienced chefs alike.
- Bake cookies at 350°F for 12 to 15 minutes until edges are lightly golden and centers remain soft.
- Customize your cookies with additions like chocolate or sea salt for varied flavors.
- Enjoy the comforting aroma and tradition of shortbread cookies, perfect for holiday gatherings.
Recipe: Five-Ingredient Cookie Delight
Shortbread cookies are the perfect balance of simplicity and indulgence, making them an ideal choice for both novice bakers and experienced chefs. With just five ingredients, these cookies aren't only quick to prepare but are also a delightful addition to any holiday gathering. Their rich buttery flavor and crumbly texture will make them a favorite among family and friends, and the process of baking them fills your home with a warm, comforting aroma.
Whether you choose to keep them plain or get creative by adding ingredients like chocolate or sea salt, shortbread cookies are customizable to suit your tastes. Best of all, they can be prepared in advance and stored for later enjoyment, allowing you to savor their goodness long after they come out of the oven.
Ingredients:
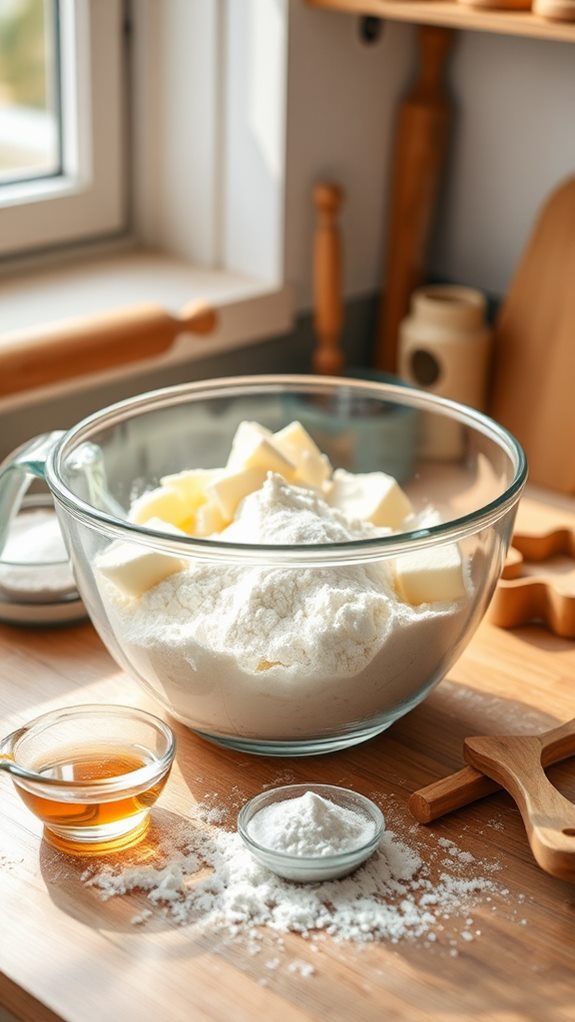
- 1 cup unsalted butter, softened
- 1/2 cup powdered sugar
- 2 cups all-purpose flour
- 1/4 teaspoon salt
- 1 teaspoon vanilla extract
To make the shortbread cookies, start by preheating your oven to 350°F (175°C). In a large mixing bowl, combine the softened butter and powdered sugar, beating until the mixture is creamy and smooth. Gradually incorporate the flour, salt, and vanilla extract, mixing until a soft dough forms.
Transfer the dough to a lightly floured surface and roll it out to about 1/2 inch thick. Use cookie cutters to cut the dough into your desired shapes, placing the cookies onto a baking sheet lined with parchment paper. Bake for 12-15 minutes until the edges are lightly golden, then allow the cookies to cool on a wire rack before serving.
When preparing your shortbread cookies, make certain the butter is at room temperature to achieve the best texture and ease of mixing. For an additional flavor twist, consider adding lemon zest or chopped nuts to the dough.
These cookies store exceptionally well in an airtight container, allowing you to enjoy their delightful taste even days later, making them a convenient treat for any occasion!
Cooking Steps
Now it's time to roll up your sleeves and get mixing! Start by creaming that buttery goodness with some powdered sugar, and trust me, you'll love how smooth it gets.
Then, add in the flour and vanilla, and watch the magic happen as you roll out the dough, cutting it into cute shapes—just don't nibble too much before they bake!
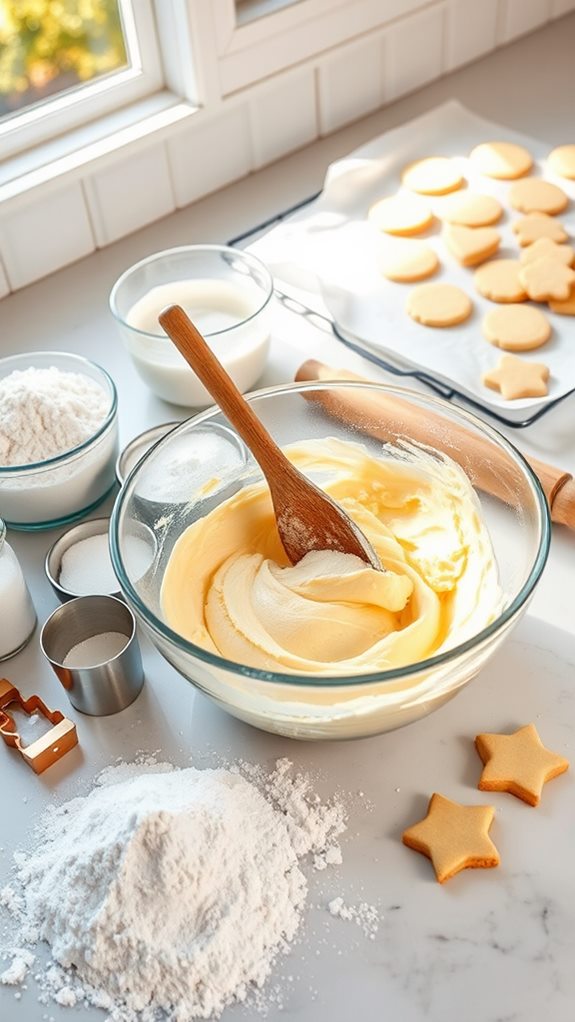
Step 1. Cream Butter and Sugar

To create the perfect shortbread cookies, start by creaming the softened butter and powdered sugar together in a large mixing bowl. Seriously, this step is key!
Make sure your butter is at room temperature; if it's too cold, you'll be staring at a stubborn lump. With a hand mixer or a wooden spoon, beat them together until it's all fluffy and smooth, just like a sweet cloud. It should look creamy and almost like frosting, so don't rush—take your time here!
Once the butter and sugar are well combined, you'll notice that it's getting lighter in color and airier. This airiness is gonna give your cookies that melt-in-your-mouth magic we all love.
And a little tip: Be careful not to overdo it—if you go too far, your cookies might end up a bit crumbly instead of tender.
Step 2. Add Flour and Vanilla
With the butter and sugar mixture perfectly creamed, it's time to incorporate the flour and vanilla extract.
First, grab your measuring cups and carefully add two cups of all-purpose flour to the bowl. Don't forget the salt—just a quarter teaspoon will do the trick! This little pinch might seem small, but it makes a big difference in flavor.
Now, here comes the fun part: add that delightful teaspoon of vanilla extract! As soon as you pour it in, you'll smell that sweet aroma wafting through your kitchen, and you might just want to sip it (but we wouldn't recommend that!).
Using a spatula or your mixer, gently blend these ingredients. You'll want to mix until a soft dough forms. If it's a bit sticky, don't worry! Just flour your hands a little when you're ready to shape it.
Step 3. Roll Out Dough Evenly
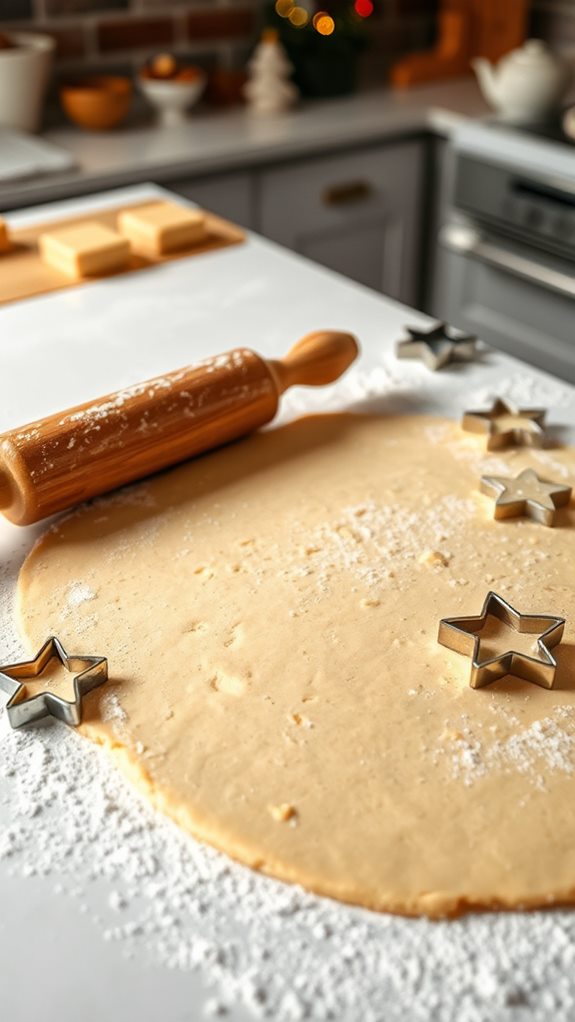
Once you've formed a soft dough, it's time to roll it out evenly. Grab your trusty rolling pin and sprinkle a little flour on your work surface to prevent sticking. Start rolling from the center of the dough outwards, pressing lightly but evenly. This helps you avoid any thick or thin spots. You want the dough to be about 1/2 inch thick, so keep an eye on it as you roll.
Here's a quick table to help you remember the essentials for rolling out your dough:
| Tip | Why It Matters | Result |
|---|---|---|
| Use room temperature butter | Guarantees dough is soft | Easier rolling |
| Lightly flour the surface | Prevents sticking | Cleaner process |
| Roll from the center | Encourages even thickness | Perfectly shaped cookies |
If it starts to stick, add a bit more flour and keep going. Don't worry if it's not perfect! Shortbread's charm is in its homemade look. Once you're happy with the thickness, you're ready to cut those cookies into fun shapes. Happy rolling!
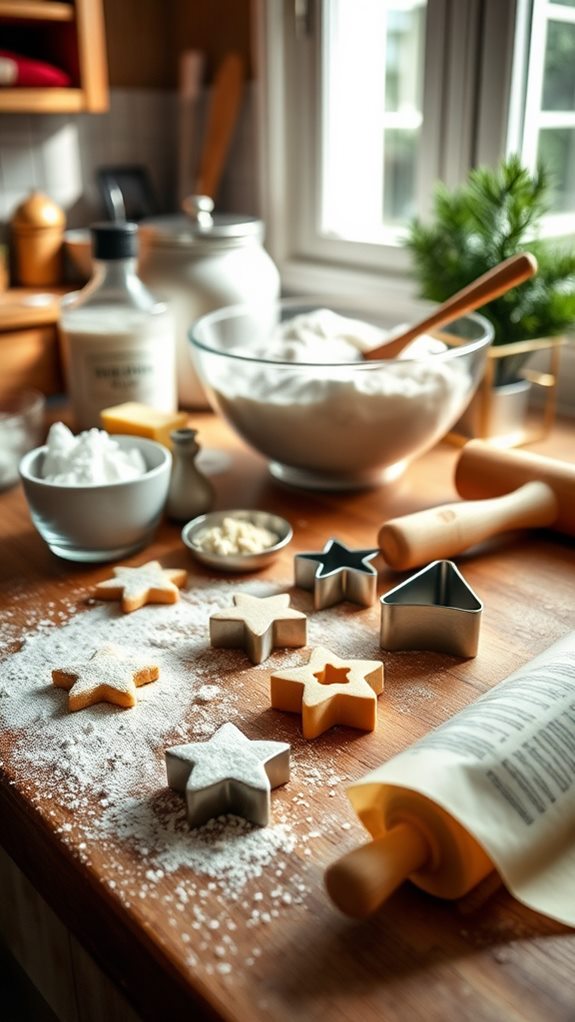
Step 4. Cut Into Cookie Shapes

As you prepare to cut your rolled-out dough into cookie shapes, make certain your cookie cutters are ready. This part is where the fun really begins! Grab those festive shapes—stars, hearts, or even little trees—and get ready to release your creativity.
Gently dust your rolling pin and the surface with a little flour so your dough doesn't stick. Now, roll your dough out to about 1/2 inch thick; this thickness will guarantee your cookies are crumbly and delicious.
When you've rolled it out, grab your cookie cutters. Press them firmly into the dough, making certain to get clean cuts. You want those shapes to stand out when they bake!
Carefully lift each cookie and place it on a baking sheet lined with parchment paper. If the dough starts to get soft or sticky, pop it back in the fridge for a few minutes. This helps keep those shapes nice and defined! Plus, it's a great excuse to take a little break.
Keep cutting until all your dough is shaped. Soon, you'll have a tray full of adorable cookies ready to bake!
Step 5. Bake Until Lightly Golden

Place your baking sheet in the preheated oven and set the timer for 12 to 15 minutes. Keep an eye on those lovely little shapes as they bake—they're in for a magical transformation!
As the cookies spend time in the oven, the rich butter in the dough melts and the magic of baking begins.
You'll notice that the edges start to turn a light golden color, and that's when you'll know they're nearly ready. Don't walk away just yet! If you let them bake too long, you might end up with cookies that are crunchy instead of perfectly crumbly.
You're aiming for that crispy edge while keeping the centers soft, so trust your instincts as the timer counts down.
Once they're light golden, pull them out and let them cool on the baking sheet for a few minutes. After that, carefully transfer them to a wire rack to cool completely.
This waiting game seems tough, but the aroma wafting through your kitchen will make it all worth it! Your buttery, irresistible shortbread cookies are almost ready to delight your family and friends—so be ready to share!
History
Shortbread cookies have a fascinating history that dates back to Scotland in the 12th century, where they were originally enjoyed by the wealthy as a luxury treat. Can you imagine eating something that fancy?
Back then, shortbread started as leftover bread baked twice to create a crispy texture. It was a practical way to use up stale bread, but over time, it became a special dessert.
As sugar became more accessible, the recipe evolved. People began adding butter—lots of it! This change made shortbread deliciously rich and irresistible. Soon, the beloved cookie was popping up at special occasions, like weddings and holidays, because who can resist a buttery treat?
You'd probably think of the special shapes and flavors, right? Those adorable molds and variations, like chocolate-dipped or sprinkled with sea salt, really took off in the 19th century.
Today, shortbread is a staple at festive gatherings and cozy family moments. So, when you bake your next batch, remember, you're indulging in a yummy piece of history that's been loved for centuries! Isn't that cool?
Final Thoughts

Why not take a moment to appreciate the simple joy of baking shortbread cookies? Seriously, these buttery treats are like little bites of happiness, perfect for any holiday gathering. Just imagine the smell wafting through your kitchen as they bake, making everyone's mouth water.
Plus, the best part? You don't need a ton of fancy ingredients. You probably already have most of what you need right in your kitchen!
Whether you're making them for family, friends, or just treating yourself (because hey, you deserve it!), shortbread cookies are a surefire hit. You can keep them classic, or get a bit adventurous with chocolate dips or fancy sprinkles.
They're cool either way! And if you bake a big batch, you can store them in an airtight container and enjoy them for days—if they last that long!
Conclusion
So, there you have it—you're all set to impress your family and friends with these super easy, buttery shortbread cookies! Just imagine the smiles when they take that first bite. Whether you keep them simple or fancy them up with chocolate or sea salt, you can't go wrong. Plus, they're perfect for holiday gatherings or cozy nights in. So grab those five ingredients, roll up your sleeves, and get baking! Your taste buds will thank you later!